We are now ready to begin the implementation of our
cell-level encryption, based on our previous requirements. This involves
two basic steps:
Implementing the Key Hierarchy
We will implement our key
hierarchy based upon requirements 3 and 4. The service master key is
the highest tier in this hierarchy and exists at the instance level. As
previously noted, the service master key of our instance was created
when our instance was setup. The pre-existence of the service master key
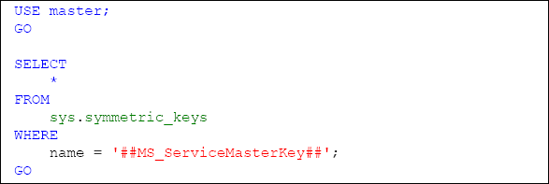
can be confirmed by querying the sys.symmetric_keys catalog view of the master database for the key with the name of ##MS_ServiceMasterKey##, as shown in Listing 1.
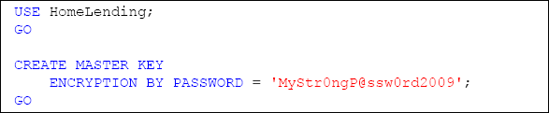
Our first step will be to create a database master key for our HomeLending database. This is accomplished using the CREATEMASTERKEY method. The ENCRYPTIONBYPASSWORD argument is required and defines the password used to encrypt the key, as shown in Listing 2.
The requirement of defining the ENCRYPTIONBYPASSWORD
argument might be a bit confusing since our intent, based upon
requirement 4, is to protect the database master key with the service
master key, instead of a password. Creating the database master key, as
shown in Listing 2,
not only protects the database master key with a password; but also
automatically adds the additional protection by the service master key.
The use of either key encryption method is valid for opening the
database master key.
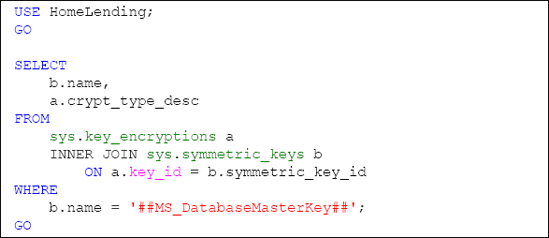
If we execute a query against the sys.key_encryptions catalog view, for the ##MS_DatabaseMasterKey## key, as shown in Listing 3, we see that ENCRYPTIONBYMASTERKEY is returned, which is in reference to the service master key.
The next step is to create a self-signed certificate that is protected by the database master key of our HomeLending
database. All certificates created within SQL Server, as opposed to
being imported, are self-signed. This associates the certificate to the
database.
Certificates are created using the CREATECERTIFICATE method. The arguments of this method include:
Certificate_Name,
the name of the certificate in the database and the means by which we
will reference this certificate in our stored procedures.
WITH SUBJECT, used to provide a descriptive reference to the certificate, for informational purposes.
Since this certificate will be
used to protect the symmetric keys that encrypt and decrypt the data
that has the sensitivity classification of "High", we will name this
certificate MyHighCert, as shown in Listing 4.
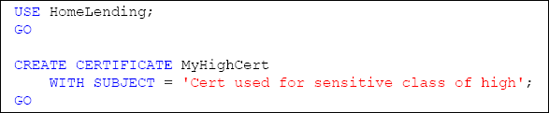
An optional argument when creating a certificate is ENCRYPTION BY PASSWORD.
This argument defines a password protection method of the certificate's
private key. In our creation of the certificate we have chosen to not
include this argument; by doing so we are specifying that the
certificate is to be protected by the database master key.
The final key in our hierarchy
is the symmetric key that will be used to encrypt the sensitive data.
The choice of a symmetric key is based upon requirement 3, which is
derived from our need for efficiency and strength. The symmetric key is
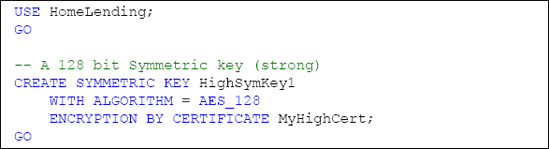
created through the execution of the CREATESYMMETRICKEY method.
The arguments to this method include:
Key_name, the unique name of the key, in the database, and the means by which we reference this key in our views and stored procedures.
WITH ALGORITHM, which defines the algorithm used that directly affects the strength of the key.
ENCRYPTION BY, which defines the protection method of the key. The key used in the ENCRYPTIONBY argument can be a certificate, another symmetric key, asymmetric key or a password. We will use our MyHighCert certificate to achieve the seamless functionality that we are expecting.
Since this key will be used to protect data with the sensitivity classification of "High", we will name it HighSymKey1. Since requirement 3 requires a key length of 128 bits and the use of the AES algorithm, we use AES_128 for the WITH ALGORITHM argument, as shown in Listing 5.
Granting Permission to Use the Symmetric Key
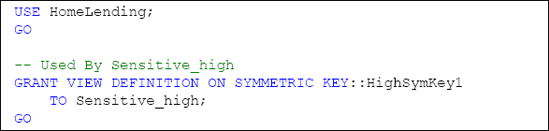
Once we have created our symmetric key we will need to define the
database roles that have permissions to use it. This is accomplished
through use of the GRANT method. In order to use this symmetric key, our database role will require VIEW DEFINITION permissions. Since the Sensitive_high
database role is the only one that we are allowing to encrypt and
decrypt data that has a sensitivity classification of "High", we will
grant the VIEW DEFINITION permissions to that role.
Testing the Access to Key Hierarchy
Now that our encryption key hierarchy has been created, we need to verify that it is effective. The native functionality of the sys.symmetric_keys catalog view reveals the symmetric keys to which a user either has VIEW DEFINITION permissions directly granted, or has permission to access through membership of a database role that has been granted VIEW DEFINITION permissions.
Through the use of EXECUTEASUSER, we can impersonate another user within the database. The use of REVERT
terminates the impersonation and returns us to our original user
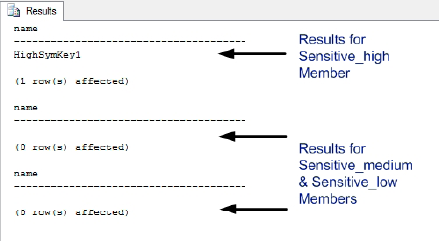
account. For our verification, we are selecting a user that is a member
of the Sensitive_high database role, a user that is a member of the Sensitive_medium database role and a user that is a member of the Sensitive_low database role.
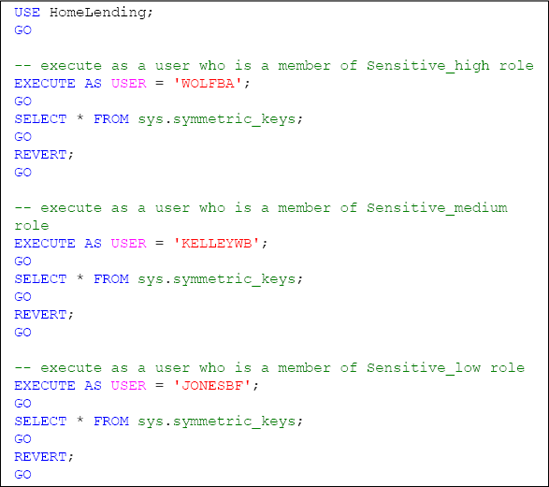
Successful validation is confirmed by the fact that only the user that is a member of the Sensitive_high database role will return a row that reflects the metadata of our HighSymKey1 symmetric key.
Required Schema Modifications
The binary data
type stores the numeric representation of a value based upon a fixed
length, which is set when the data type is used. For example, use of a
binary data type with the fixed length of five would store the value of
"0x4100000000" for the character of "A".
The varbinary data
type stores the same numeric representation; but with a variable length.
For example, the value of "A" is stored with the value of "0x41" while
"ABC" is stored as "0x414243". The binary and varbinary data types both have a maximum length of 8,000 characters.
Cell-level encryption requires the encrypted value to be stored in a column that is the data type of varbinary since the encryption methods of EncryptByAsymKey, EncryptByCert, EncryptByKey and EncryptByPassphrase returns their cipher text in varbinary.
Creating the Encrypted Column
In our review of our Borrower_Identification table, the column that contains the sensitivity classification of "High" is the Identification_Value column. Currently, this information is being stored in plain text using the varchar
data type. In order to implement cell-level encryption, based on our
previously-established key hierarchy, we will need to create a column in
our table that will capture the encrypted value as a varbinary data type. Listing 8 shows how to accomplish this using the ALTERTABLE method.
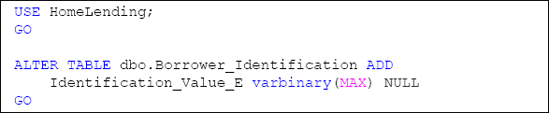
Since the column by the name of Identification_Value already exists, we chose to name this new column Identification_Value_E, with the " E " representing the fact that the column is encrypted. At a later point in this process we will drop the Identification_Value column, since we do not want to maintain storage of our sensitive data in plain text.
The NULL constraint to the column definition states that the column can accept the value of NULL. It is not our intention to allow NULL
values in the column once cell-level encryption is in place; but since
we will be adding this column to existing rows, we will temporarily
permit the value of NULL to prevent an error when creating the column.
It is important to note that the ALTERTABLE method should be executed when the database is not in use by other users. The ALTERTABLE
method implements a lock on the table during its processing. Large
volumes of rows in a table that is being altered will result in a
lengthy execution time and could result in lock contention, deadlocks
and overall poor performance for other transactions that are attempting
to access the table.
Populating the Encrypted Column
Now that we have added our new Identification_Value_E column, we need to populate the column with the encrypted values, based upon the plain text in the original Identification_Value column and the symmetric key HighSymKey1.
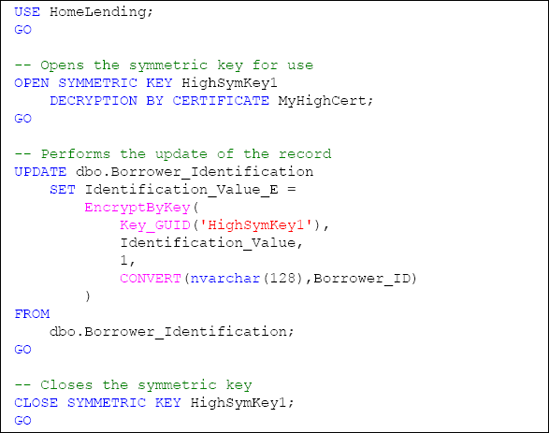
The script shown in Listing 9 opens the HighSymKey1 symmetric key, allowing us to perform the encryption functions, and then updates the Identification_Value_E column in the Borrower_Identification table with the encrypted value, using the EncryptByKey method. An example of the syntax for this method is as follows:
EncryptByKey(Key_GUID([KeyName]),[Clear_Text],
            [Add_Authenticator],[Authenticator])
We are passing four arguments to the EncryptByKey method in order to perform the encryption:
Key_GUID: A reference to the symmetric key that is used for encryption. The Key_GUID
system function is used to return the GUID value of the key based upon
its name. This GUID value is used by this method to locate the symmetric
key.
Clear_Text:
The plain text value that we wish to encrypt. Since we are updating
based upon the contents of the table, we supply the reference to the Identification_Value column.
Add_Authenticator: A value indicating whether or not we want to use an authenticator
with the encryption. The value of "1" indicates that it is to be used,
while the value of "0", or the absence of this argument, indicates that
it is not to be used.
Authenticator: The value that is used for the authenticator.
An authenticator is a
value that is hashed and appended to the plain text prior to encryption.
This increases the strength of the resulting encrypted value since
decryption requires the passing of the authenticator, if used. In the
case of our sample database we will use the Borrower_ID column value as our authenticator, since it is a value that will not change for the row and identifies the borrower that the Borrower_Identification column references.
Note that if an
authenticator is used and the value on which the authenticator is
dependent changes, the result will be a failed decryption attempt.
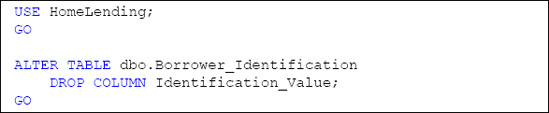
Through the successful execution of the script in Listing 9, the plain text values that are stored in the Identification_Value column will have been encrypted and stored in the Identification_Value_E column. The next step in this process is to remove the plain text values, stored in the Identification_Value column, from the table. We can do this using the ALTER TABLE method and the DROP COLUMN argument, as shown in Listing 10.
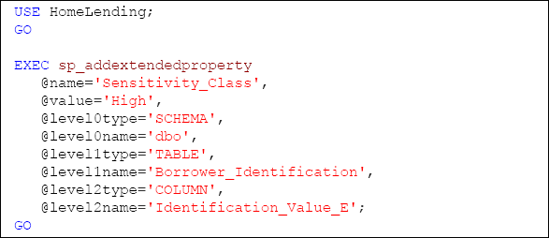
One final step is to apply the extended property that reflects the sensitivity classification of the Identification_Value_E column, which is "High". This is accomplished through the execution of the sp_addextendedproperty system stored procedure, as demonstrated in Listing 11.